
ESP32 Handgesture recognition
Table of Contents
What is ESP32?
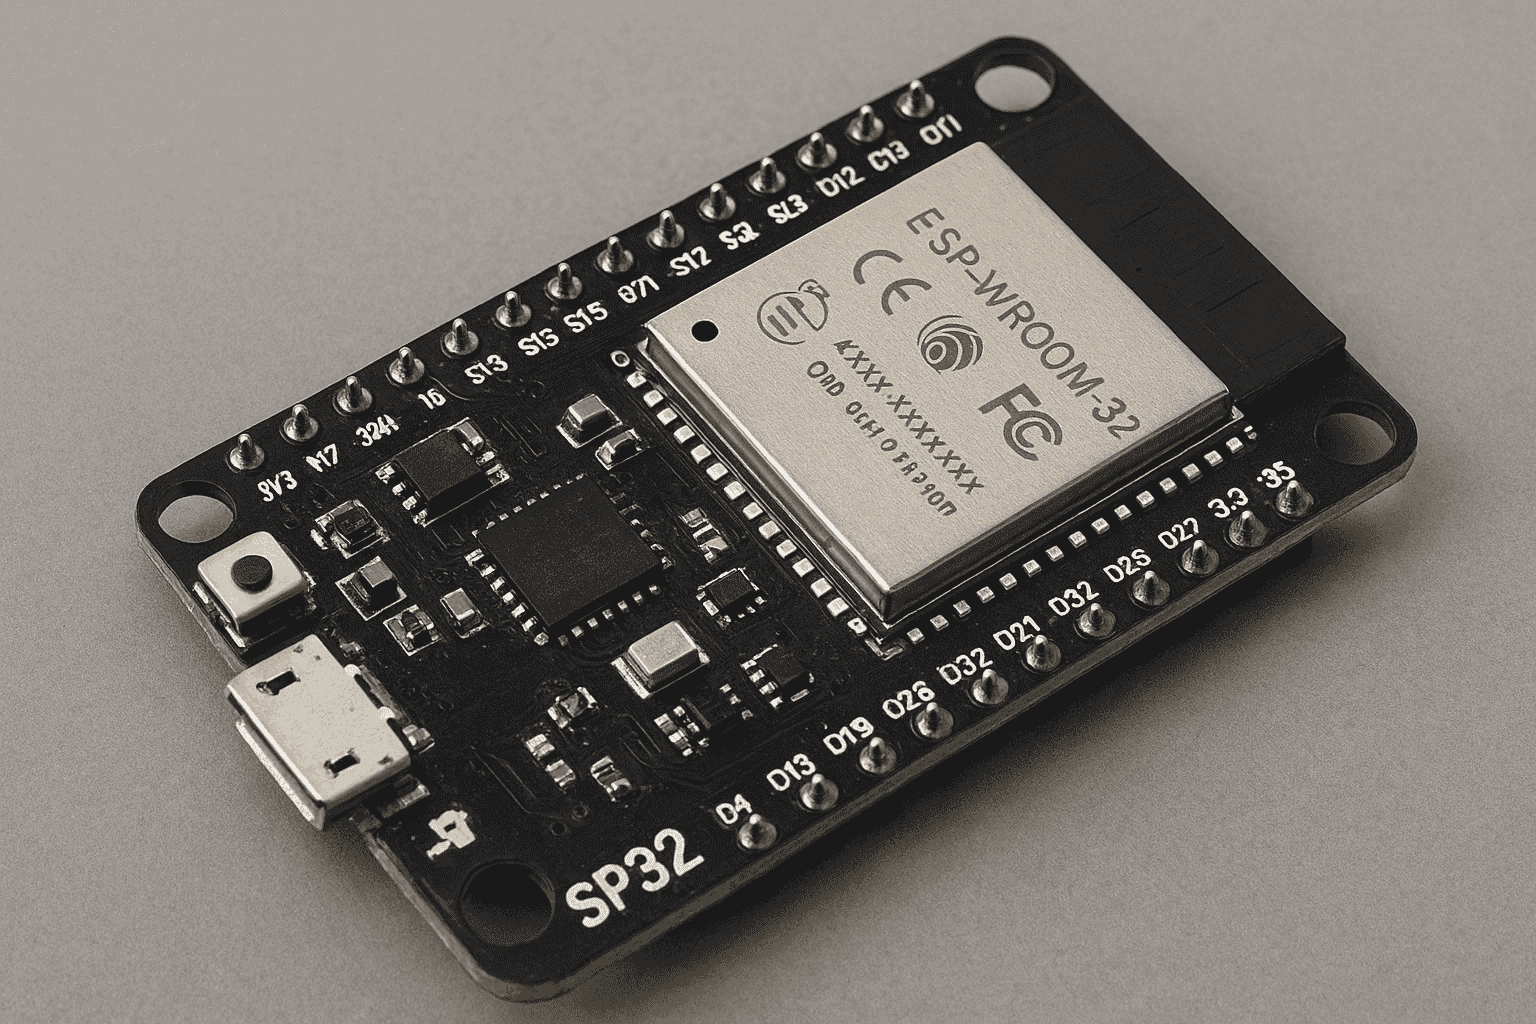
The ESP32 is a powerful and versatile microcontroller developed by Espressif Systems, designed for a wide range of applications, especially in the realm of IoT (Internet of Things). With low power consumption, integrated wifi offer the possibilities of making small web servers, smart data automation and much more.
Introduction to Hand Gesture Recognition
Gesture recognition is an area of research and development in computer science and language technology concerned with the recognition and interpretation of human gestures. A subdiscipline of computer vision, it employs mathematical algorithms to interpret gestures.Wikipedia
Applications of Esp32
Integrating machine learning algorithms for hand gesture recognition on microcontrollers and edge devices—such as the ESP32—is challenging due to limited resources like memory, processing power, and energy efficiency. However, doing so enables seamless interaction between users and IoT hardware, unlocking intuitive and responsive control systems.
Tools and frameworks
- ESP32 Development Board (such as ESP32-WROOM-32)
| Memory Type | Size | Notes |
|---|---|---|
| Flash | 4–16 MB | External SPI flash |
| Internal SRAM | 520 KB | Split between DRAM (320 KB) and IRAM (200 KB) |
| RTC SRAM | 16 KB | For low-power operations |
| External PSRAM | 8 MB | Ideal for large data sets and ML workloads |
- PlatformIO Extention fro VSCode
- Any ESP32 Camera (recommended OV2640 or similar quality)
- LCD Screen or any output for microcontroller even leds are a viable option
Setup Enviroment
- Installing Python
- Install PlatformIO IDE Extention for vscode
- Create new project with platformIO
- Set
platformio.ini# platformio.ini [env:freenove_esp32_wrover] platform = espressif32 board = freenove_esp32_wrover framework = arduino monitor_speed = 115200 # If using TFLite model ; board_build.partitions = huge_app.csv lib_deps = # WiFi Module for the Web Server WiFi # LCD Monitor for our output LiquidCrystal_I2C # If using TFLite model tanakamasayuki/TensorFlowLite_ESP32@^1.0.0
Architecture approaches
Two different strategies are possible:
🌐 Remote Processing via Web Server
In this approach, the ESP32 acts as a web server, capturing image data from its camera and transmitting it to an external endpoint for processing. The external server elaborate this data in semi-real time and returns the results to the ESP32. The microcontroller then displays or acts upon the received output.
This method leverages powerful remote systems for complex tasks, reducing the computational burden on the ESP32.

🤖 On-Device Inference with TFlite Model
Alternatively, a compact and efficient machine learning model can be deployed directly on the ESP32. This allows the microcontroller to perform inference locally, using its limited resources to predict outcomes and display results without relying on external devices. This strategy ensure faster response and autonomy but require an optimized model or the limited processing will slow things down.

Machine learning model
🧠 Using Mediapipe
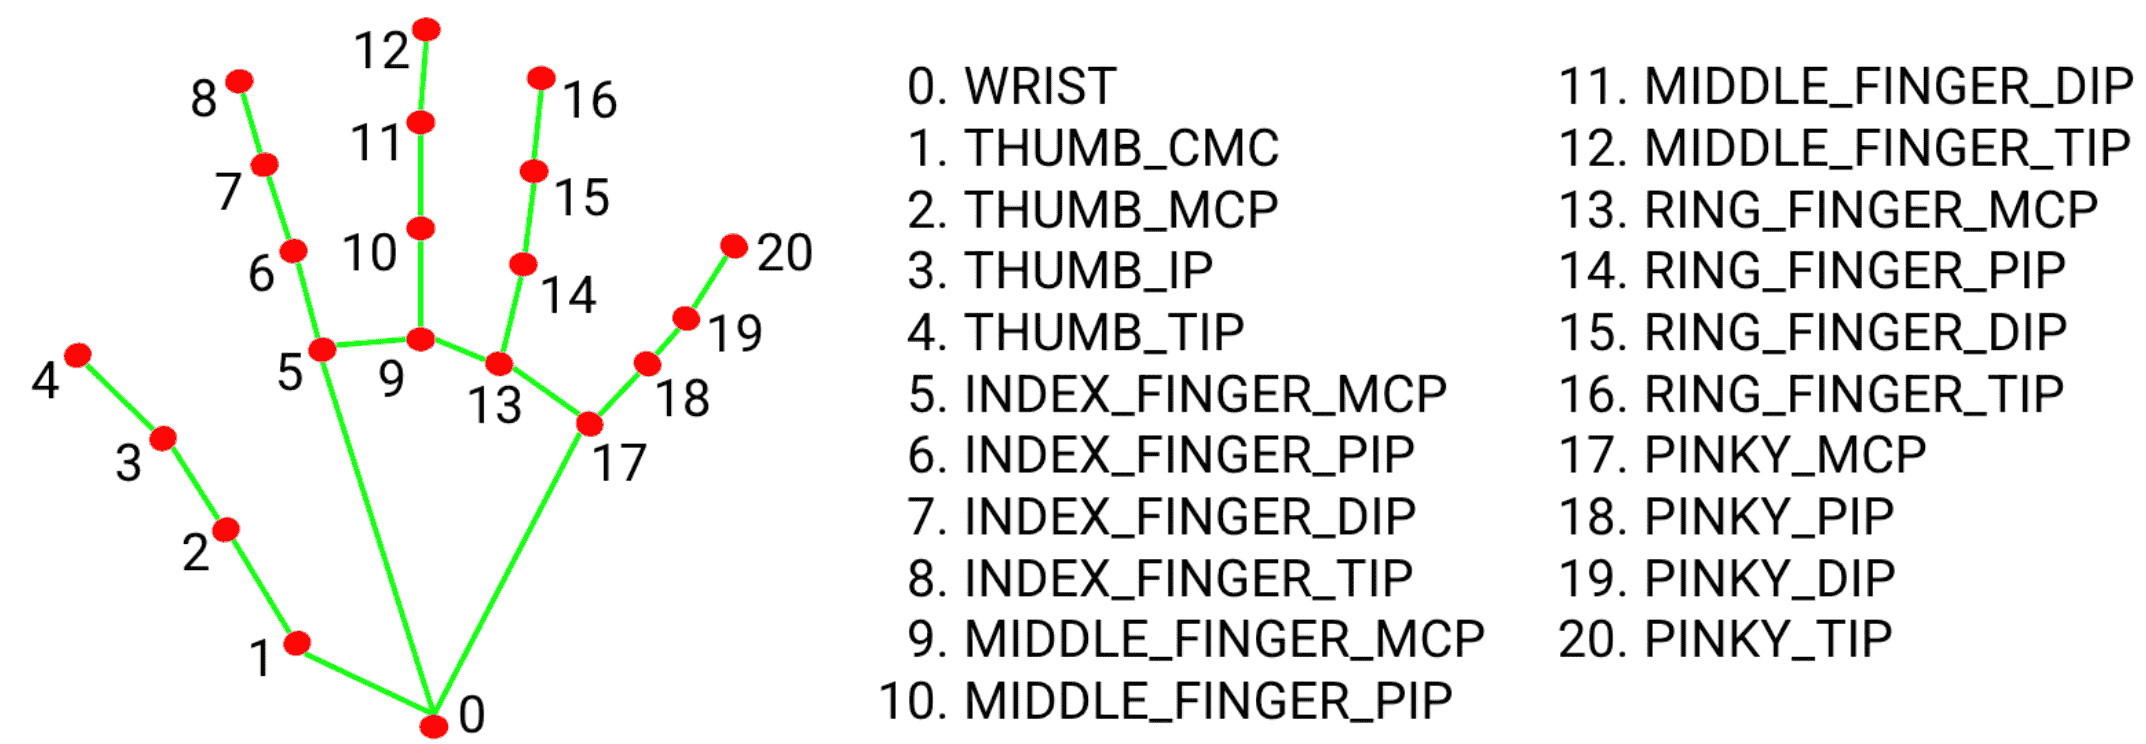
This model uses MediaPipe to recognize hand gesture. It detects hand landmark by using a simple pre trained neural network and sends corresponding control commands to an ESP32,
Prerequisites
- MediaPipe is a customizable machine learning solutions framework developed by Google. It is an open-source and cross-platform framework, and it is very lightweight. MediaPipe comes with some pre-trained ML solutions such as face detection, pose estimation, hand recognition, object detection, etc.
Model

🧠 Using a Pretrained model
Instead of creating our own dataset with can rely on existing dataset like the Kaggle hand gesture dataset to train a model with it and use it for our application.
- Pro We don't have to gather data
- Con restricting the signs we can use with the ones in the dataset.
Prerequisites
Model
model=models.Sequential()
model.add(layers.Conv2D(32, (5, 5), strides=(2, 2), activation='relu', input_shape=(120, 320,1)))
model.add(layers.MaxPooling2D((2, 2)))
model.add(layers.Conv2D(64, (3, 3), activation='relu'))
model.add(layers.MaxPooling2D((2, 2)))
model.add(layers.Conv2D(64, (3, 3), activation='relu'))
model.add(layers.MaxPooling2D((2, 2)))
model.add(layers.Flatten())
model.add(layers.Dense(128, activation='relu'))
model.add(layers.Dense(10, activation='softmax'))
// Classification classes
{'01_palm': 8,
 '02_l': 0,
 '03_fist': 9,
 '04_fist_moved': 1,
 '05_thumb': 7,
 '06_index': 4,
 '07_ok': 6,
 '08_palm_moved': 5,
 '09_c': 2,
 '10_down': 3}
🧠 Using a Pretrained model with custom data
We can create our own dataset to train a model with any gesture we need adapted to the enviroment the esp32 is used.
Prerequisites
- Mediapipe
- Data gathering
Model
Reference: How to Train Custom Hand Gestures Using Mediapipe
1. Collect and Preprocess the data
Use the ESP32 camera to collect the training data.
- Gather camera frames from different gestures (e.g., wave, fist, thumbs up)
- Using
MediaPipeto detect and extract landmark points from hand gestures in video frames. - Storing the extracted landmarks along with their corresponding gesture labels in a CSV file for training.
- Preprocess the data by normalizing or scaling it
2. Train
- Creating a neural network model to classify gestures based on the extracted landmarks.
- Train the model
- Convert the Model to TensorFlow Lite
3. Deploy the Model on ESP32
- Using the trained model to predict gestures in real-time based on new landmark data.
To run the model on the ESP32, you will use TensorFlow Lite for Microcontrollers, which is optimized for running ML models on low-resource devices.

Step-by-Step Implementation
Web Application Integration
Step 1: Set Up Flask
from flask import Flask, request, jsonify
import cv2
import numpy as np
import mediapipe as mp
from keras.models import load_model

# Flask app
app = Flask(__name__)
Step 2: Create the Flask Application
# Initialize MediaPipe
mpHands = mp.solutions.hands
hands = mpHands.Hands(max_num_hands=1, min_detection_confidence=0.7)
mpDraw = mp.solutions.drawing_utils

# Load gesture recognizer model
model = load_model('mp_hand_gesture')

# Load class names
with open('gesture.names', 'r') as f:
    classNames = f.read().split('\n')

@app.route('/predict', methods=['POST'])
def predict():
    # Read raw JPEG bytes from request
    npimg = np.frombuffer(request.data, np.uint8)
    frame = cv2.imdecode(npimg, cv2.IMREAD_COLOR)

    if frame is None:
        return jsonify({'error': 'Invalid image'}), 400

    # Process frame
    x, y, c = frame.shape
    frame = cv2.flip(frame, 1)
    framergb = cv2.cvtColor(frame, cv2.COLOR_BGR2RGB)
    result = hands.process(framergb)
    className = ''

    if result.multi_hand_landmarks:
        landmarks = []
        for handslms in result.multi_hand_landmarks:
            for lm in handslms.landmark:
                lmx = int(lm.x * x)
                lmy = int(lm.y * y)
                landmarks.append([lmx, lmy])

        # Predict gesture
        prediction = model.predict([landmarks])
        classID = np.argmax(prediction)
        className = classNames[classID]

    return jsonify({'gesture': className})
Step 3: Run the Flask Application
if __name__ == '__main__':
    app.run(host='0.0.0.0', port=5000)
Esp32 code
Step 1: Import Necessary Packages
#include "esp_camera.h"
#include <WiFi.h>
#include <HTTPClient.h>
#include <LiquidCrystal_I2C.h>

// ==== Wi-Fi config ====
const char *ssid = "YOUR_WIFI_SSID";
const char *password = "YOUR_WIFI_PASS";

// ==== Flask server URL ====
String serverUrl = "http://<SERVER_IP>:5000/predict"; // replace with your server IP

// ===== LCD setup =====
LiquidCrystal_I2C lcd(0x27, 16, 2);

// ==== Camera pins (WROVER Kit) ====
#define CAMERA_MODEL_WROVER_KIT
#include "camera_pins.h"
Step 2: Initialize
void setup()
{
  Serial.begin(115200);

  // LCD init
  Wire.begin(13, 14); // SDA = 13, SCL = 14
  lcd.init();
  lcd.backlight();
  lcd.setCursor(0, 0);
  lcd.print("Connecting...");

  // Connect Wi-Fi
  WiFi.begin(ssid, password);
  Serial.print("Connecting to WiFi");
  while (WiFi.status() != WL_CONNECTED)
  {
    delay(500);
    Serial.print(".");
  }
  Serial.println("\nWiFi connected!");
  lcd.clear();
  lcd.setCursor(0, 0);
  lcd.print("WiFi Connected");
  lcd.setCursor(0, 1);
  lcd.print(WiFi.localIP());

  // Camera configuration
  camera_config_t config;
  config.ledc_channel = LEDC_CHANNEL_0;
  config.ledc_timer = LEDC_TIMER_0;
  config.pin_d0 = Y2_GPIO_NUM;
  config.pin_d1 = Y3_GPIO_NUM;
  config.pin_d2 = Y4_GPIO_NUM;
  config.pin_d3 = Y5_GPIO_NUM;
  config.pin_d4 = Y6_GPIO_NUM;
  config.pin_d5 = Y7_GPIO_NUM;
  config.pin_d6 = Y8_GPIO_NUM;
  config.pin_d7 = Y9_GPIO_NUM;
  config.pin_xclk = XCLK_GPIO_NUM;
  config.pin_pclk = PCLK_GPIO_NUM;
  config.pin_vsync = VSYNC_GPIO_NUM;
  config.pin_href = HREF_GPIO_NUM;
  config.pin_sccb_sda = SIOD_GPIO_NUM;
  config.pin_sccb_scl = SIOC_GPIO_NUM;
  config.pin_pwdn = PWDN_GPIO_NUM;
  config.pin_reset = RESET_GPIO_NUM;
  config.xclk_freq_hz = 20000000;
  config.pixel_format = PIXFORMAT_JPEG;
  config.frame_size = FRAMESIZE_VGA;
  config.jpeg_quality = 30;
  config.fb_count = 1;
  config.fb_location = CAMERA_FB_IN_PSRAM;

  if (esp_camera_init(&config) != ESP_OK)
  {
    Serial.println("Camera init failed");
    while (true)
    {
      delay(1000);
    }
  }

  // Sensor configuration to fix color and orientation
  sensor_t *s = esp_camera_sensor_get();
  s->set_quality(s, 10);
  s->set_vflip(s, 1);      // Flip vertically if needed
  s->set_hmirror(s, 1);    // Mirror horizontally if needed
  s->set_brightness(s, 0); // Adjust brightness (-2 to 2)
  s->set_contrast(s, 1);   // Improve contrast (-2 to 2)
  s->set_saturation(s, 2); // Boost color saturation (-2 to 2)
  s->set_awb_gain(s, 1);   // Enable auto white balance
  Serial.println("Camera ready!");
}
Step 3: Send Frames from Webcam with http
void loop()
{
  if (WiFi.status() != WL_CONNECTED)
    return;

  camera_fb_t *fb = esp_camera_fb_get();
  if (!fb)
  {
    Serial.println("Camera capture failed");
    delay(1000);
    return;
  }

  HTTPClient http;
  http.begin(serverUrl);
  http.addHeader("Content-Type", "image/jpeg");

  int httpCode = http.POST(fb->buf, fb->len); // Send JPEG buffer

  esp_camera_fb_return(fb);

  if (httpCode > 0)
  {
    String payload = http.getString();

    // Get gesture
    int start = payload.indexOf(":\"") + 2;
    int end = payload.indexOf("\"", start);
    String gesture = payload.substring(start, end);

    lcd.clear();
    lcd.setCursor(0, 0);
    lcd.print("Gesture:");
    lcd.setCursor(0, 1);
    lcd.print(gesture);
    Serial.println("Server response: " + gesture);
  }
  else
  {
    Serial.printf("Error sending request: %d\n", httpCode);
  }

  http.end();
  delay(1000); // send every 1 second
}